Homemade Churro Ice Cream Cups: A Mess-Free Path to Dessert Bliss
Imagine biting into a perfectly crisp, cinnamon-sugar-coated shell, giving way to a soft, tender interior, all while cradling a scoop of your favorite ice cream. This isn't a dream from a high-end dessert shop; it's the delightful reality of homemade churro ice cream bowls cups, and they are, without a doubt, better than anything you'll find pre-made. Forget the deep fryer, the splattering oil, and the laborious clean-up. This revolutionary method brings the iconic churro experience to your kitchen, baked to perfection, making gourmet dessert accessible and enjoyable for everyone. For too long, the idea of homemade churros has been synonymous with messy deep-frying, deterring many home cooks. But what if we told you there's a simpler, cleaner way to achieve that quintessential churro crunch and flavor, transformed into a sturdy, edible vessel for your coldest treats? Our recipe for baked churro ice cream cups eliminates the need for hot oil, delivering all the crispy, sweet satisfaction with none of the fuss. Prepare to elevate your dessert game and impress your guests with these irresistible, perfectly portioned delights.Why Baked Churro Ice Cream Cups Trump Traditional Frying (and Store-Bought)
The allure of a freshly made churro is undeniable, but the thought of managing a vat of hot oil can be daunting. This is where the magic of baked churro ice cream bowls cups truly shines. By opting for the oven, you unlock a multitude of benefits that traditional frying simply can't match, and certainly surpasses the often-stale experience of store-bought alternatives. * No Mess, No Stress: This is arguably the biggest win. Deep-frying inevitably leads to oil splatters, lingering odors, and a significant clean-up. Baking keeps your kitchen pristine, allowing you to focus on the joy of creating. * Healthier Indulgence: While still a treat, baking significantly reduces the fat content compared to deep-frying. You get the same incredible texture and flavor without the heavy feeling. * Superior Texture Control: Our no-fail baking method ensures a consistent result every time: a beautiful crisp exterior that gives way to a wonderfully tender, almost custardy inside. This contrasts sharply with often dense or overly greasy fried versions, and certainly beats the sometimes cardboard-like texture of mass-produced items. The dough receives a crucial setting step before hitting the oven, guaranteeing that signature churro crispness. * Unbeatable Freshness and Flavor: Store-bought churro products often lack the vibrancy and warmth of a homemade treat. When you bake these churro ice cream bowls cups yourself, you control the quality of ingredients, and the aroma of baking cinnamon and vanilla filling your home is an experience in itself. * Customization Galore: From the size of your cups (standard muffin tin for larger bowls, mini for delightful bites) to the toppings you choose, homemade means endless possibilities. These sturdy vessels are robust enough to hold generous scoops of ice cream, fruit salads, or even decadent fudge sauce without collapsing. If you're still on the fence about ditching the fryer, consider the ease and consistent quality of this baked approach. It’s a method that truly tricks everyone into thinking these came straight from a bakery, perhaps even better. For a deeper dive into the crisping techniques, check out our guide on Bake Crispy Churro Ice Cream Bowls: No Deep Frying Needed.Crafting Your Perfect Churro Bowl: The Step-by-Step Guide
Making these incredible churro ice cream bowls cups involves a few key stages, but each step is straightforward and designed for success. The secret lies in a classic choux pastry dough, transformed into an edible canvas for your favorite frozen desserts.Gather Your Simple Pantry Staples:
You'll be surprised how few ingredients are needed to create such a show-stopping dessert. Quality ingredients, however, make a big difference.
- Butter: Essential for richness and helping the dough maintain its structure.
- Water: The base for our pastry.
- White Granulated Sugar: For sweetness in the dough and the all-important cinnamon-sugar coating.
- Pure Vanilla Extract: Adds a beautiful depth of flavor.
- Ground Cinnamon: The quintessential churro spice.
- Salt: Balances the sweetness and enhances other flavors.
- All-Purpose Flour: The structural backbone of the dough.
- Large Eggs (at room temperature): Crucial for the dough's texture and binding everything together.
The Dough Masterclass:
- Prep Your Stage: Preheat your oven to a robust 225°C (440°F). Then, turn your standard or mini muffin tin upside down. The "cups" should be facing up. Generously grease these inverted cups and the surrounding area with butter. Butter works superior to cooking spray here, ensuring a non-stick surface and a lovely golden finish.
- The Simmering Start: In a medium saucepan, melt the butter. Add the water, 2 tablespoons of sugar, vanilla, cinnamon, and salt. Bring this mixture to a gentle simmer for about 5 minutes, stirring occasionally to dissolve the sugar and infuse the flavors.
- Flour Power: Remove the saucepan from the heat. Add the 1 ¼ cups of all-purpose flour all at once. Stir vigorously with a large wooden spoon until the mixture comes together and forms a cohesive ball of dough, pulling away from the sides of the pan. This process cooks the flour and develops the dough's structure.
- The Egg Integration: Take the dough off the heat and let it cool for about 5 minutes, or until it's just warm to the touch. This cooling step is critical to prevent the eggs from scrambling. Now, add one egg, beating rapidly and continuously until it's fully incorporated. The dough might look like it’s separating at first, but keep beating – it will come together! Repeat this process with the second egg until you have a smooth, thick, and glossy dough.
Piping to Perfection:
- Load Your Bag: Scoop the dough into a strong, double-lined pastry bag fitted with a large open star tip nozzle (a Wilton 1M is excellent for this). The dough is quite thick, so using a robust bag is essential. For easier handling and to prevent bursting, divide the dough in half within the bag with your fingers and pipe a little at a time.
- Shape the Bowls: Starting from the base of an inverted muffin cup, pipe the dough in a spiral motion upwards to form a bowl shape. Make sure to leave an empty cup between each piped bowl; this allows the churro pastry to expand without merging. Lightly press each layer of dough together as you pipe to close up any potential gaps.
- The Crispy Secret: Do not skip this! Lightly spray each piped churro bowl with cooking oil spray. This step is key to achieving that beautiful golden brown, utterly crispy texture during baking.
Baking for Bliss:
Bake the churro bowls for 35-40 minutes, or until they are deeply golden brown and crispy to the touch. Remove them from the oven and let them cool slightly on the muffin tin before gently peeling them off. A non-stick pan is crucial here, or they *will* stick!
The Sweet Finish:
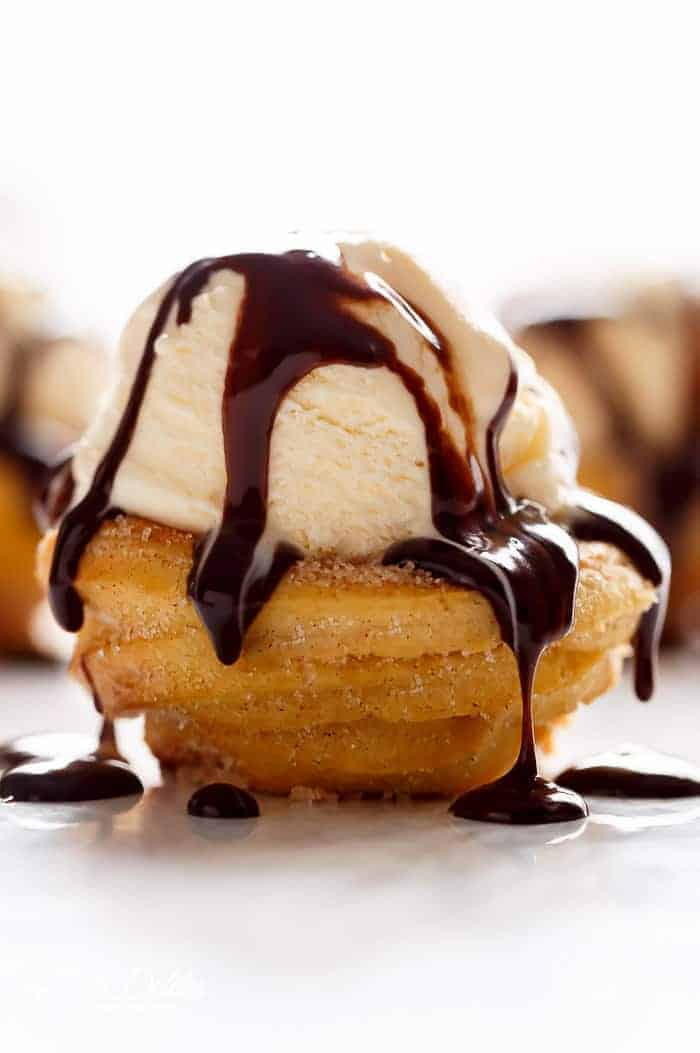
While the bowls are still warm, fill a shallow bowl with cinnamon sugar (½ cup sugar, ½ teaspoon cinnamon). You might need to give the bowls another light spray of oil to help the sugar stick. Roll or brush each bowl evenly with the cinnamon sugar until fully coated. Serve immediately with your favorite ice cream, fresh fruit, or a luscious chocolate fudge sauce.
