Easy Baked Churro Bowls: Your No-Fail Recipe for Deliciousness
Imagine the classic crunch of a churro, that delightful cinnamon-sugar coating, and a tender, soft interior – but instead of a long, messy fried stick, it's perfectly formed into a sturdy, edible bowl, ready to cradle a scoop of your favorite ice cream. Welcome to the world of easy baked churro bowls, also affectionately known as churro ice cream bowls or churro cups. This revolutionary method bypasses the splattering oil and heavy cleanup of traditional deep-frying, delivering all the authentic churro flavor and texture with surprising simplicity. Get ready to transform your dessert game with a recipe that promises crispy, golden perfection every time. These baked churro ice cream bowls are not just a clever novelty; they are a genuine culinary triumph. Crispy on the outside, wonderfully soft on the inside, they embody everything you love about a traditional churro. The real magic? Achieving this signature crunch and tender crumb without ever touching a deep fryer. This no-fail technique ensures your churro cups emerge from the oven looking and tasting like they came straight from a gourmet bakery, proving that some of the best desserts are also the easiest to make at home.Why Baked Churro Bowls are a Game-Changer (and Better Than Fried!)
The allure of churros is undeniable, but the thought of deep frying at home can be daunting. From managing hot oil to the lingering smell and the inevitable mess, it's often a deterrent for home cooks. This is precisely where baked churro ice cream bowls redefine the experience. Here’s why baking is the superior choice for your churro cups: * No Deep Frying, No Mess: Say goodbye to oily countertops and the need for specialized frying equipment. Baking eliminates the hassle, making this a much more approachable dessert for any day of the week. * Healthier Indulgence: While still a treat, baking significantly reduces the fat content compared to deep frying, allowing you to enjoy your churro ice cream bowls with a little less guilt. * Consistent Texture Every Time: The baking method provides a more controlled environment, leading to uniformly golden and crispy exteriors coupled with perfectly soft interiors. The unique "no-fail" technique, which involves setting the dough before baking, ensures that delightful churro texture every single time, fooling even the most discerning palates into believing they're traditional. * Versatility Unleashed: These sturdy baked churro cups are designed to hold their shape, making them ideal vessels for ice cream, fruit salads, puddings, or even savory dips if you opt for a less sweet coating. They’re far more practical than their stick-shaped counterparts. * Better Than Store-Bought: Many who try this recipe claim the homemade version is even better than what you can buy. The warmth of fresh cinnamon-sugar coating, combined with the perfectly baked pastry, creates an irresistible experience. For a deeper dive into making these incredible desserts, check out our guide on Bake Crispy Churro Ice Cream Bowls: No Deep Frying Needed.Essential Ingredients for Your Perfect Churro Bowl Dough
Crafting these delightful churro ice cream bowls requires a handful of simple pantry staples. The magic truly happens when these basic ingredients come together to form a rich, pliable choux pastry dough. Here’s a breakdown of what you'll need and why each component is crucial: * Butter (4 oz): This forms the rich base of the dough, contributing to its luxurious flavor and helping it firm up during baking to maintain the bowl shape. * Water (1 cup + 2 tablespoons): Essential for hydration, the water combines with the butter to create the initial liquid base. When heated, the steam generated by the water helps the pastry puff and become light and airy. * White Granulated Sugar (2 tablespoons + ½ cup for coating): A small amount goes into the dough for subtle sweetness and to aid in browning and crispiness. The larger portion is for the iconic cinnamon-sugar coating. Using white granulated sugar yields crispier results for the bowls themselves. * Pure Vanilla Extract (1 teaspoon): Adds a beautiful aromatic depth that complements the cinnamon perfectly. * Ground Cinnamon (½ teaspoon + ½ teaspoon for coating): The signature spice of churros! It's infused into the dough and then generously mixed with sugar for the final coating. * Salt (½ teaspoon): A crucial flavor enhancer that balances the sweetness and brings out the best in the other ingredients. Don't skip it! * All-Purpose Flour (1 ¼ cups): The structural backbone of your churro dough. When added to the hot liquid, it cooks slightly, forming a paste that is fundamental to choux pastry. * Large Eggs (2, at room temperature): These are critical for binding the dough, adding richness, and helping the pastry rise and puff beautifully in the oven. Using room temperature eggs ensures they incorporate smoothly into the warm dough without curdling.Step-by-Step Guide to Crafting Your Churro Ice Cream Bowls
Ready to create your own batches of these incredible churro cups? Follow this detailed guide for a seamless baking experience.1. Prep Your Muffin Tin
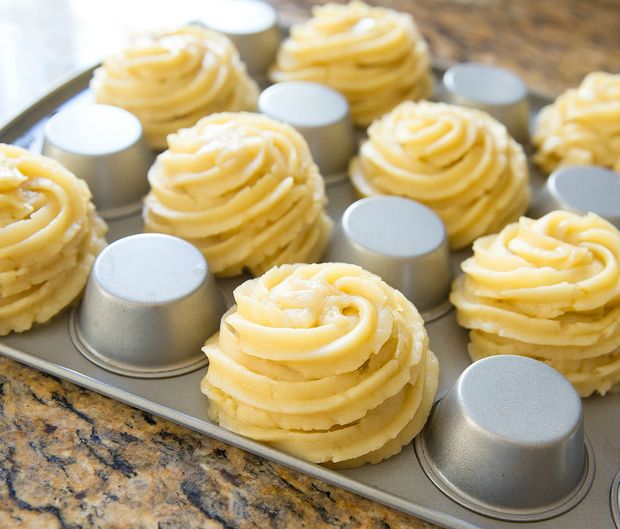
Preheat your oven to a robust 225°C (440°F). This high heat is crucial for creating that initial puff and crisp exterior. The next step is a little unconventional but vital: turn your standard or mini muffin tin upside down. The open holes should face down, and the individual cups should face up. Now, thoroughly grease the outside of every second cup and the area around it with butter. Butter works much better than cooking oil spray here, ensuring a non-stick surface that releases easily. Leaving an empty cup between each piped bowl is important to allow the pastry ample room to expand without merging.
2. The Choux Pastry Base
- In a medium-sized saucepan, melt the butter over medium heat.
- Add the water, 2 tablespoons of sugar, vanilla, ½ teaspoon of cinnamon, and salt. Bring this mixture to a gentle simmer for about 5 minutes, stirring occasionally, allowing the flavors to meld.
- Remove the saucepan from the heat and immediately add all the flour at once. Stir vigorously with a large wooden spoon until the mixture comes together into a cohesive ball and pulls away from the sides of the pan. This step is crucial for drying out the dough slightly, which helps create a crisper final product.
- Allow the dough to cool slightly for 5 minutes, or until it's just warm to the touch. This prevents the eggs from scrambling when added.
- Now, add one large egg. Beat quickly and thoroughly until it's completely incorporated. It might look like it's not coming together at first, appearing shaggy or broken, but keep beating! Persistence will pay off, and the dough will eventually smooth out. Repeat this process with the second egg until a smooth, thick, and shiny dough forms. This vigorous beating helps develop the choux pastry's structure.
3. Piping Perfection
- Scoop your churro dough into a strong, double-lined pastry bag fitted with a large open star tip nozzle (a Wilton 1M works wonderfully for this). The dough is quite thick, so a sturdy bag is essential to prevent bursting. A clever tip is to divide the dough in half within the bag with your fingers and pipe a little at a time to manage the pressure.
- Starting from the bottom of an inverted muffin cup, pipe the dough in a continuous spiral, working your way up to form a bowl shape. Lightly press each layer together to close up any potential gaps, creating a strong structure. Remember to pipe around every second cup, leaving space for expansion.
- Don't skip this critical step: Lightly spray each piped churro bowl with cooking oil spray. This is the secret to achieving that coveted crispy exterior in a baked churro. Without it, your bowls might be tender but won't have the signature crunch.
4. Bake Until Golden
- Carefully transfer your muffin tin with the piped churro bowls to the preheated oven.
- Bake for 35-40 minutes, or until the bowls are beautifully golden brown and crispy to the touch. The exact time may vary slightly depending on your oven.
- Once baked, allow the churro bowls to cool slightly on the muffin tin before attempting to remove them. This gives them time to firm up and prevents them from sticking or breaking.
5. The Cinnamon-Sugar Finish
- While your bowls are baking or cooling, prepare your cinnamon sugar. In a shallow bowl, combine the remaining ½ cup of sugar with ½ teaspoon of ground cinnamon. Stir well to mix evenly.
- Once the churro bowls are cool enough to handle, gently remove them from the muffin tin.
- To help the cinnamon sugar adhere, you may need to give each bowl another light spray of cooking oil or brush with melted butter.
- Roll and coat each churro bowl evenly in the cinnamon sugar mixture, ensuring every crevice is covered in that delicious sparkle. For more great tips on mastering these incredible desserts, read our full article on Homemade Churro Ice Cream Cups: Better Than Store-Bought, No Mess.
